ACLS Certification Course
(Advanced Cardiac Life Support)
Welcome to the Advanced Cardiac Life Support (ACLS) certification course by United Medical Education. Here you will learn appropriate techniques to recognize and treat those in respiratory failure, potentially fatal arrhythmias, and pulseless cardiac arrest. The life saving interventions learned in the ACLS certification course are used to supplement the fundamental techniques learned in the Basic Life Support (BLS) course. In both courses teamwork among providers is emphasized.
Need ACLS Certification?
It’s Trusted by Over 100,000+ Students
Register for ACLS Certification
$119
Register for ACLS Recertificaiton
$119
Hemodynamics
It is important to be able to categorize your patients by their hemodynamic stability when choosing an appropriate treatment regimen.
Stable:
- Patient presents with an arrhythmia.
- Vital signs maintain patient asymptomatic without chest pain, shortness of breath, or confusion.
- Patient remains conscious.
- There is a high risk for patient becoming unstable.
Unstable:
- Patient presents with an arrhythmia.
- Vital Signs cause patient to become symptomatic with chest pain, shortness of breath, or confusion.
- Patient has a high risk of death.
Dead:
- Patient presents with arrhythmia.
- Patient has no pulse, is without vital signs, and/or is unconscious.
- Best chance for success is Electrical Therapy within 10 minutes of event!
Basic Treatment Associated with Stability
Stable:
O: Oxygen
M: Monitor
V: vascular access
Unstable & Dead:
I: IV access
C: CPR
E: ET intubation
D: Defibrillator/monitor
CPR: for adults
CABD (Circulation, Airway, Breathing, Defibrillate)
There is a common acronym in BLS used to guide providers in the appropriate steps to assess and treat patients in respiratory and cardiac distress. This is CAB-D (Circulation, Airway, Breathing, Defibrillate). The following scenario will help guide you in performing CAB-D.
You find an adult lying on the ground.
Assess to make sure the scene is safe for you to respond to the down patient.
Assess Responsiveness: Stimulate and speak to the adult asking if they are ok. Look at the chest and torso for movement and normal breathing.
If unresponsive:
- (One provider) first call the emergency response team and bring an AED to the patient.
- (Two providers) Have someone near call the emergency response team and bring the AED.
Place patient supine on a hard flat surface.
Circulation
- Check the patient for a carotid pulse for 5-10 seconds. (Do not check for more than 10 seconds.)
If the patient has a pulse:
Move to the airway and rescue breathing portion of the algorithm:
- Provide 10 rescue breaths per minute (1 breath every 6 seconds).
- Recheck pulse every 2 minutes.
If the patient doesn’t have a pulse:
Begin 5 cycles of CPR (lasts approximately 2 minutes).
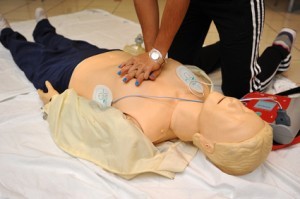
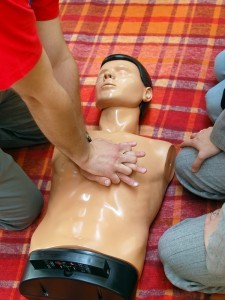
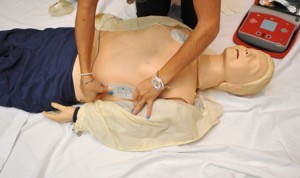
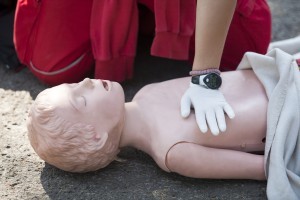
Start with chest compressions:
- Provide 100 to 120 compressions per minute. This is 30 compressions every 15 to 18 seconds.
- Place your palms midline, one over the other, on the lower 1/3 of the patient’s sternum between the nipples.
- lock your arms.
- Using two arms press to a depth of 2 to 2.4 inches (5-6cm) or more on the patient’s chest.
- Press hard and fast.
- Allow for full chest recoil with each compression.
1 cycle of adult CPR is 30 chest compressions to 2 rescue breaths.
If two providers are present: switch rolls between compressor and rescue breather every 5 cycles.
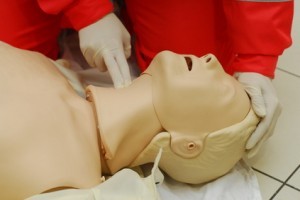
Airway
In the event of an unwitnessed collapse, drowning, or trauma:
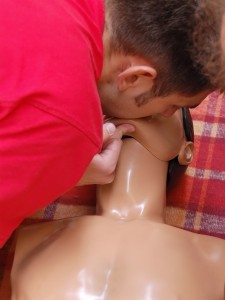
Use the Jaw Thrust maneuver. (This maneuver is used when a cervical spine injury cannot be ruled out.):
- Place your fingers on the lower rami of the jaw.
- Provide anterior pressure to advance the jaw forward.
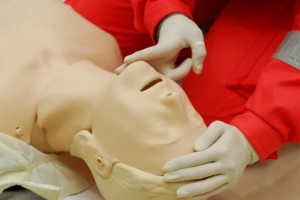
In the event of a witnessed collapse with no reason to assume a C-spine injury:
Use the Head Tilt-Chin Lift maneuver:
- place your palm on the patient’s forehead and apply pressure to tilt the head backward.
- place the fingers of your other hand under the mental protuberance of the chin and pull the chin forward and cephalic.
Breathing
Scan the patients chest and torso for possible movement during the “assess unresponsiveness” portion of the algorithm. Watch for abnormal breathing or gasping.
If the patient is breathing adequately:
Continue to assess and maintain a patent airway and place the patient in the recovery position. (Only use the recovery position if its unlikely to worsen patient injury.)
If the patient is not breathing or is breathing inadequately:
If the patient has a pulse:
- Commence rescue breaths immediately.
If the patient has no pulse:
- Begin CPR. (move to the “Circulation” portion of the algorithm.)
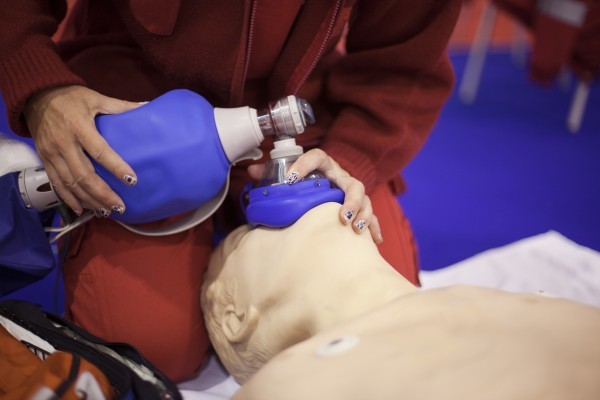
- Use a barrier device if available.
- Pinch the patient’s nose closed.
- Make a seal using your mouth over the mouth of the patient or use a pocket mask or bag mask.
- Each rescue breath should last approximately 1 second.
- Watch for chest rise.
- Allow time for the air to expel from the patient.
During normal CPR without an advanced airway:
- Provide approximately 6-8 rescue breaths per minute
During normal CPR with an advanced airway:
- Provide 10 rescue breaths per minute (don’t pause chest compressions for breaths).
If patient has a pulse and no CPR is required:
- Provide 10 rescue breaths per minute (1 breath every 6 seconds).
- Recheck pulse every 2 minutes.
If there is a foreign body obstruction:
- Perform abdominal thrusts
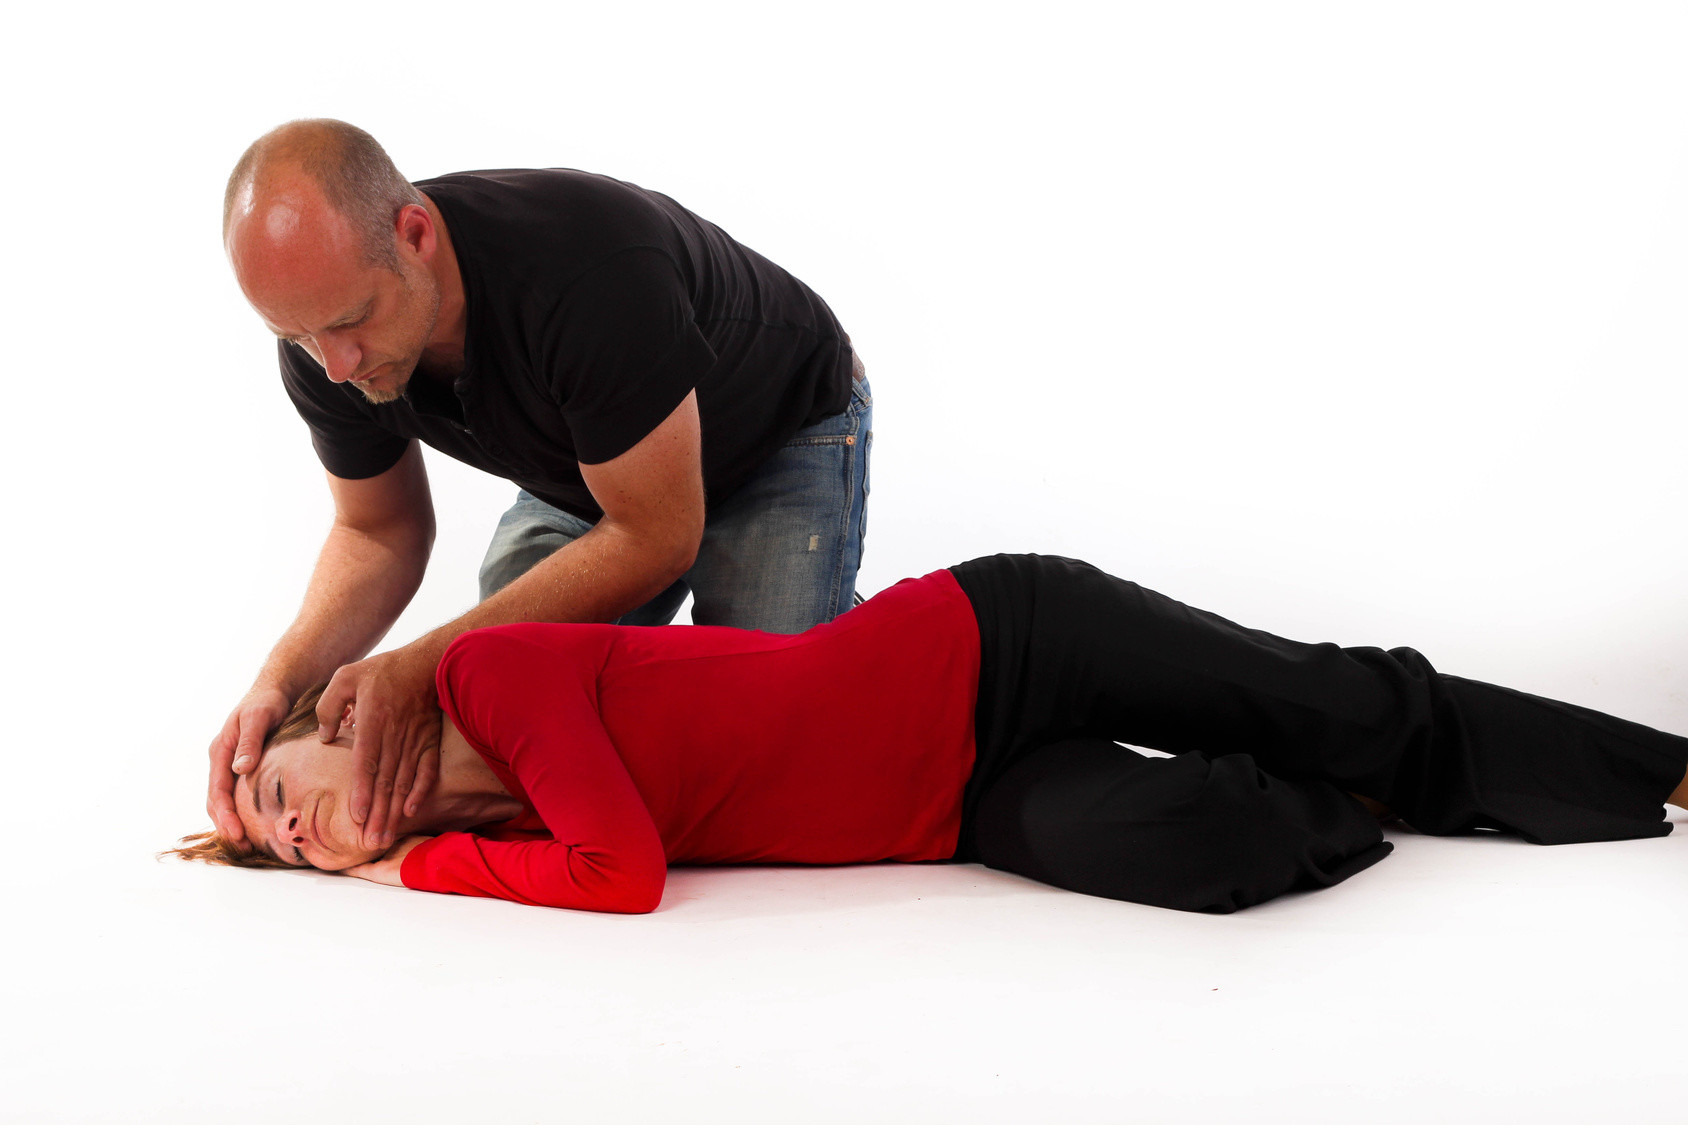
Recovery position
(lateral recumbent or 3/4 prone position):
This position is used to maintain a patent airway in the unconscious person.
- place the patient close to a true lateral position with the head dependent to allow fluid to drain.
- Assure the position is stable.
- Avoid pressure of the chest that could impairs breathing.
- Position patient in such a way that it allows turning them onto their back easily.
- Take precautions to stabilize the neck in case of cervical spine injury.
Continue to assess and maintain access of airway.
Avoid the recovery position if it will sustain injury to the patient.

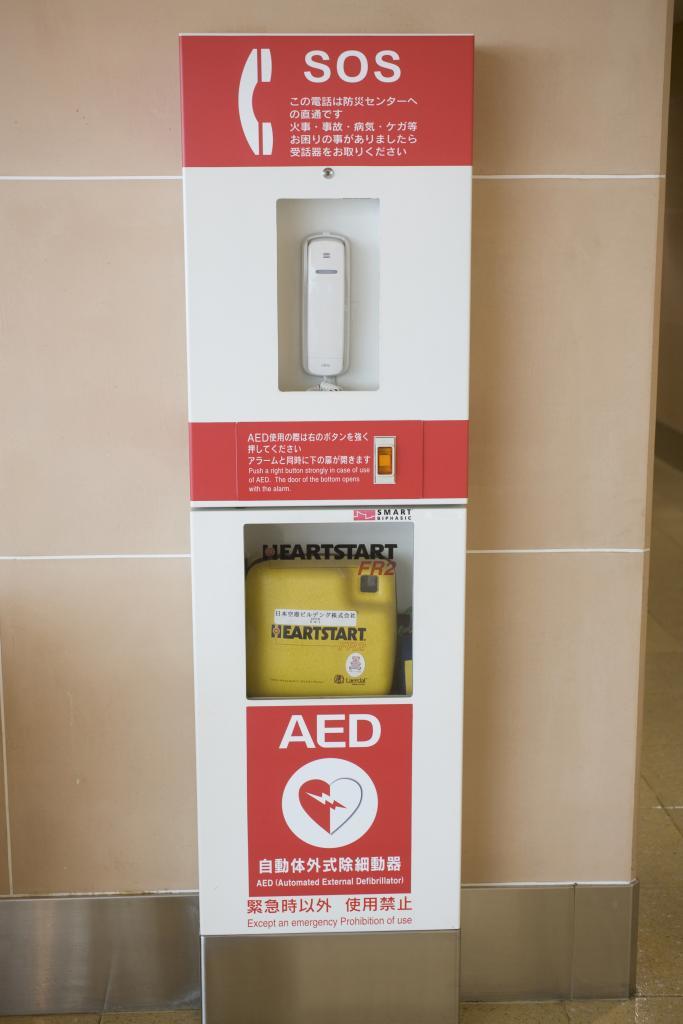
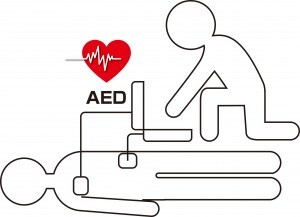
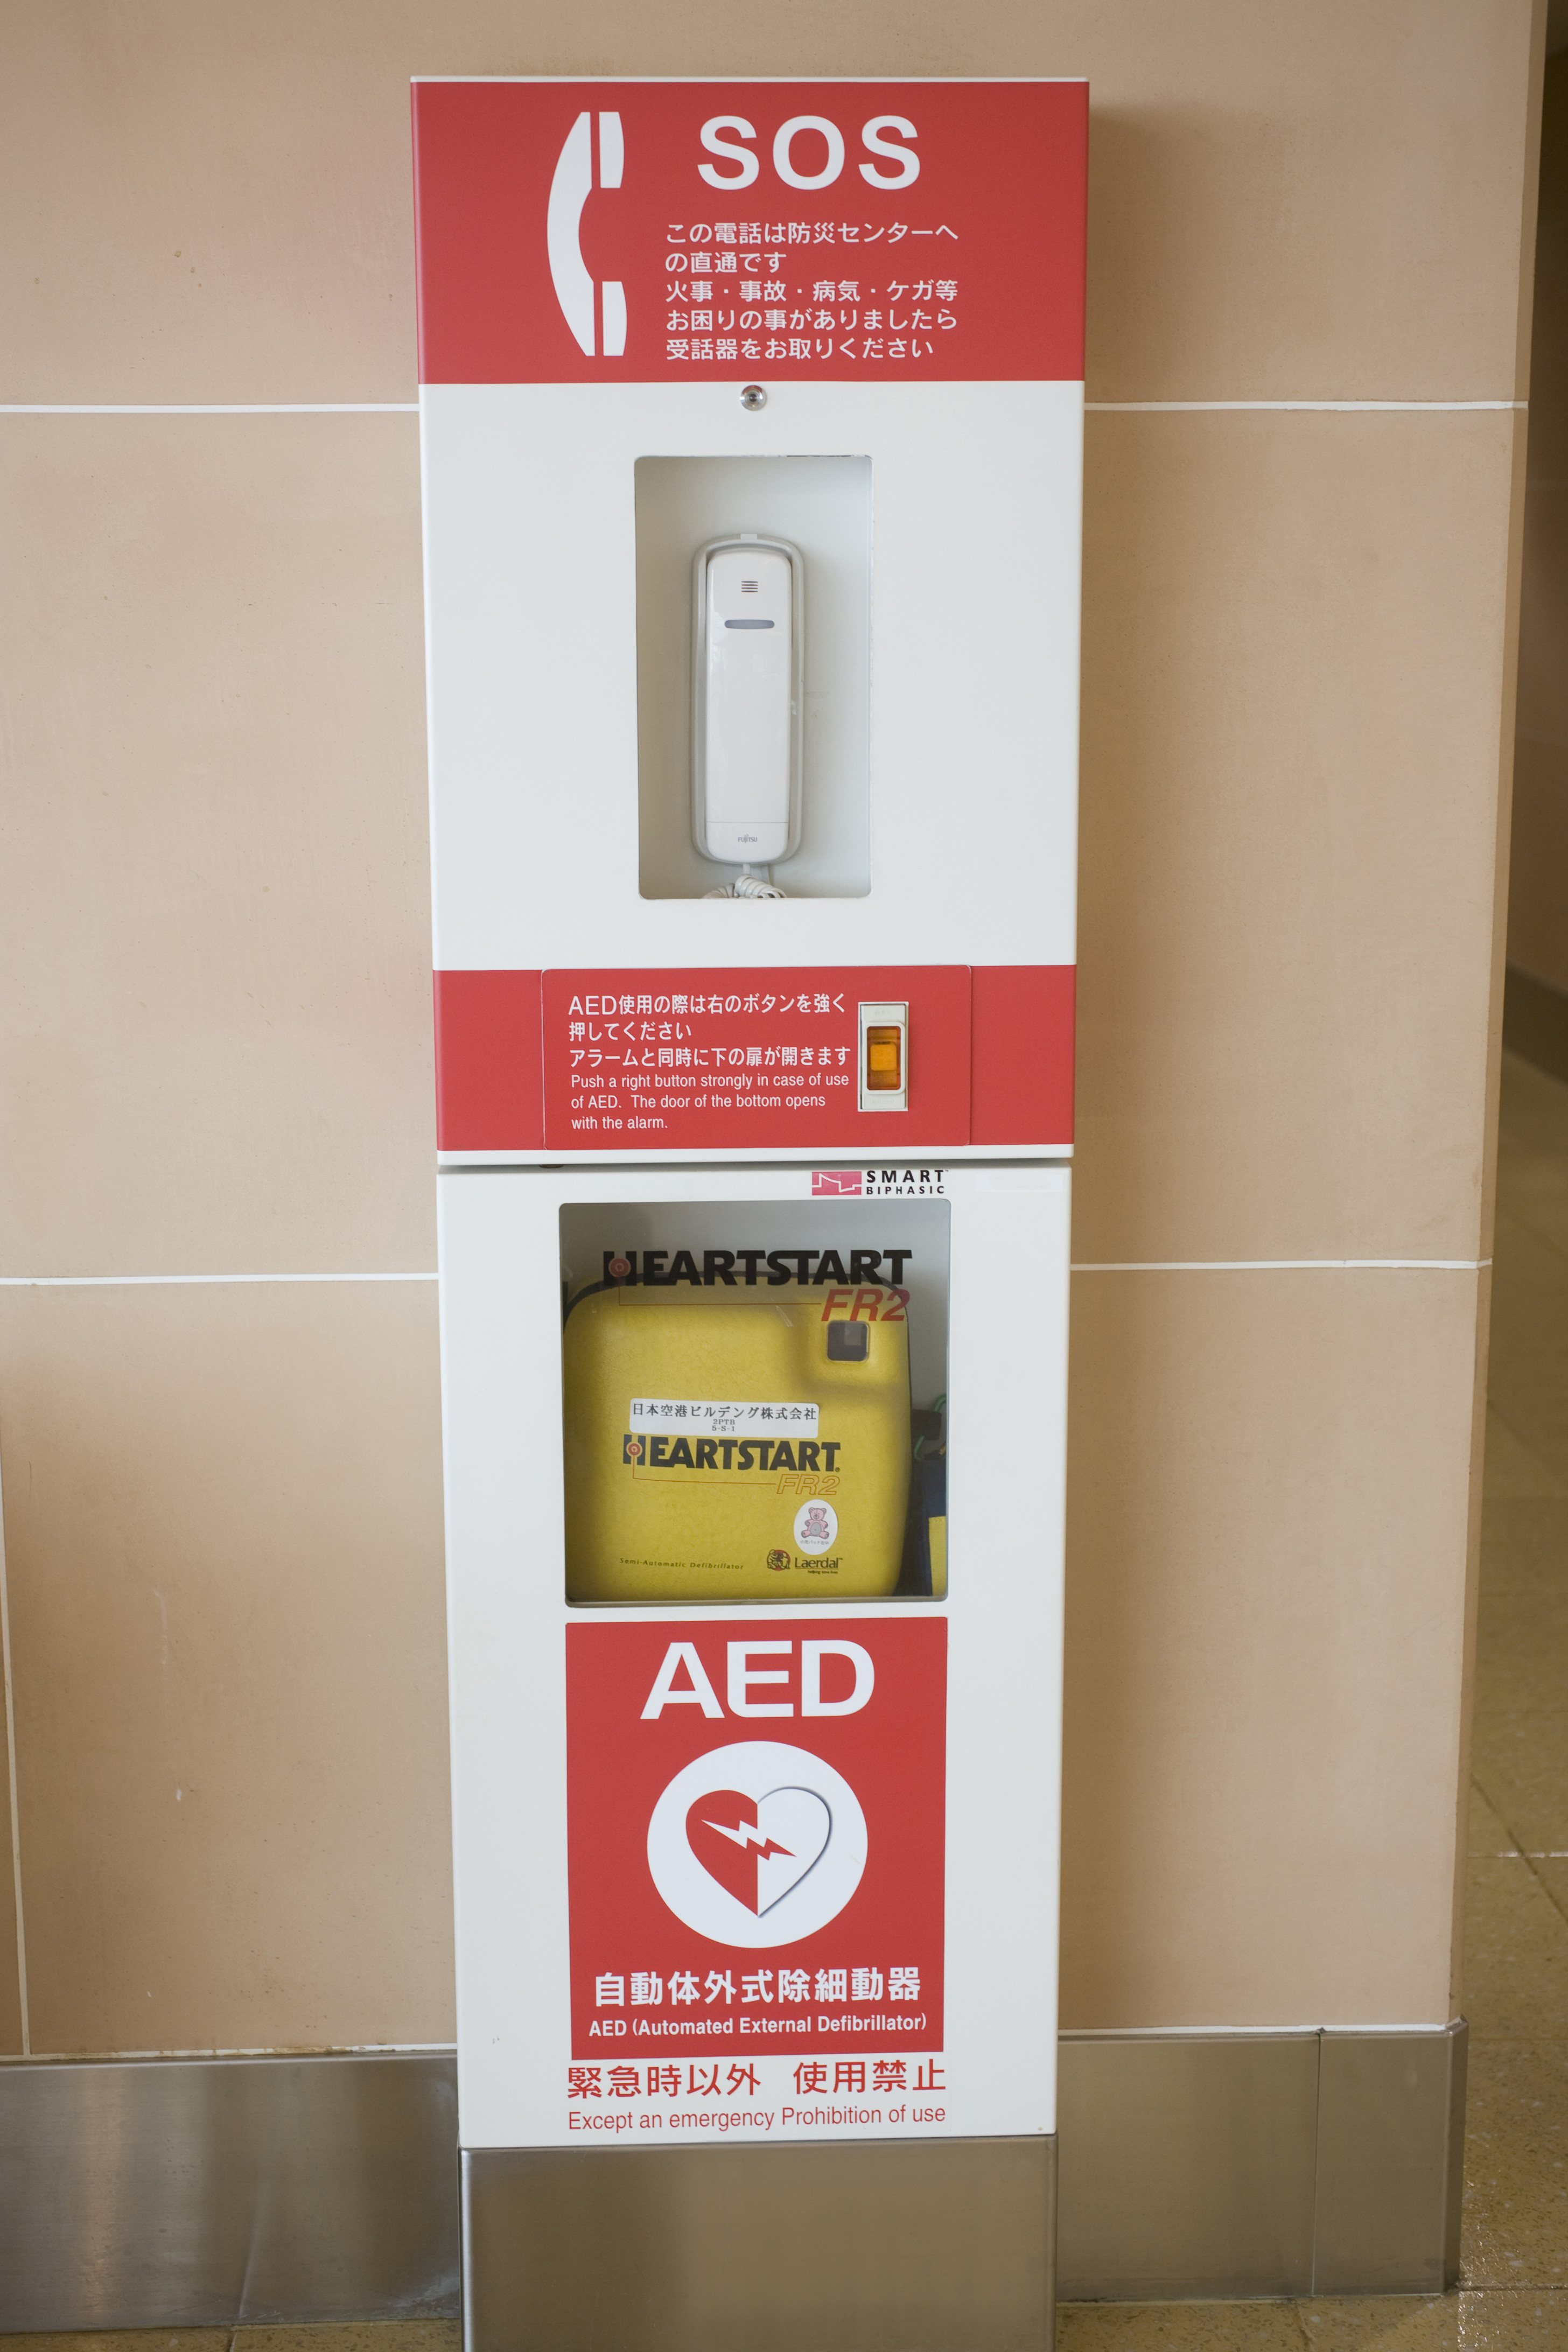
Defibrillate
Arrival of the AED (Automated External Defibrillator)
Power:
- Turn AED On NOW! (early defibrillation is the single most important therapy for survival of cardiac arrest and should be done as soon as it arrives).
- Follow verbal AED prompts.
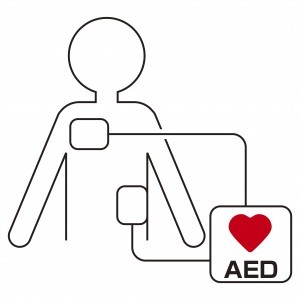
Attachment:
- Firmly place appropriate pads (adult/pediatric) to patient’s skin to the indicated locations (pad image).
Analyze:
A short pause in CPR is required to allow the AED to analyze the rhythm.
If the rhythm is not shockable:
- Initiate 5 cycles of CPR.
- Recheck the rhythm at the end of the 5 cycles of CPR.
If the shock is indicated:
- Assure no one is touching the patient or is in mutual contact of a good conductor of electricity by yelling “Clear, I’m Clear, you’re Clear!” prior to delivering a shock.
- Press the shock button when the providers are clear of the patient.
- Resume 5 cycles of CPR.
CPR: for infants 0-1 in age
CABD (Circulation, Airway, Breathing, Defibrillate)
An infant is found lying on the ground.
Assess to make sure the scene is safe for you to respond to the down patient.
Assess Unresponsiveness: Lightly shake or tap the infant’s foot and say their name. Look at the chest and torso for movement and normal breathing.
If the infant is unresponsive:
- (One provider) If alone and collapse is un-witnessed: First perform 2 minutes of CPR then call the emergency response team and bring an AED to the patient.
- (One provider) If alone and collapse is witnessed: First call the emergency response team and bring an AED, then start CPR.
- (Two providers) Have someone near call the emergency response team and bring the AED and you start CPR.
- Place patient supine on a hard flat surface.
Circulation
Feel for either the brachial or femoral pulse (Do not check for more than 10 seconds).
If the infant has a pulse:
Move to the airway and rescue breathing portion of the algorithm.
- Give 12-20 breaths per minute.
- Recheck the pulse every 2 minutes.
If the infant doesn’t have a pulse:
Begin 5 cycles of CPR (lasts approximately 2 minutes).
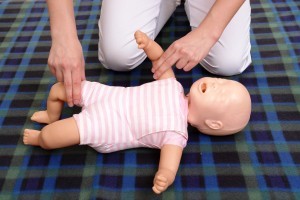
Start with Chest Compressions:
- Provide 100 to 120 compressions per minute. This is 30 compressions every 15 to 18 seconds.
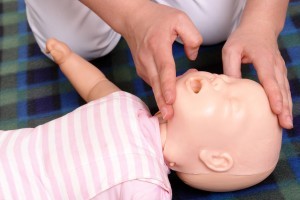
- (One provider) Place two fingers on the sternum of the lower chest. One between the nipple line and the other 1cm below.
- (Two providers) Encircle the infant’s torso with both hands with both thumbs pointing cephalic positioned 1cm below the nipples over the sternum.
- Chest Compressions should be at least 1.5 inches or 1/3 the depth of infant’s chest.
- Press hard and fast.
- Allow for full chest recoil.
- Only allow minimal interruptions to the chest compressions.
(One Provider: 1 cycle is 30 chest compressions to 2 rescue breaths) (Two Providers: 1 cycle is 15 chest compressions to 2 rescue breaths)
If you have two providers: switch rolls between compressor and rescue breather every 2 minutes or 5 cycles of CPR.
Airway
In the event of an unwitnessed collapse, drowning, or trauma:
Use the Jaw-Thrust maneuver. (This maneuver is used when cervical spine injury cannot be ruled out.):
- Place your thumbs on the upper cheek bones of the infant.
- Place your fingers on the lower rami of the jaw.
- Provide anterior pressure to advance the jaw forward.
In the event of a witnessed collapse and there’s no reason to assume C-spine injury:
Use the Head Tilt-Chin Lift maneuver:
- place your palm on the patient’s forehead and apply pressure to tilt the head backward.
- place the fingers of your other hand under the mental protuberance of the chin and pull the chin forward and cephalic.
Breathing
Scan the patients chest and torso for possible movement during the “assess unresponsiveness” portion of the algorithm. Watch for abnormal breathing or gasping.
If the infant has adequate breathing:
- Continue to assess and maintain a patent airway and place the infant in the infant recovery position. (Only use the recovery position if its unlikely to worsen patient injury)
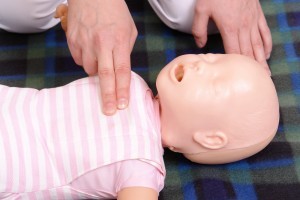
If the infant is not breathing or is inadequately breathing:
If the infant has a pulse:
- commence rescue breaths immediately.
If the infant doesn’t have a pulse:
- begin CPR (go to Circulation portion of the algorithm).
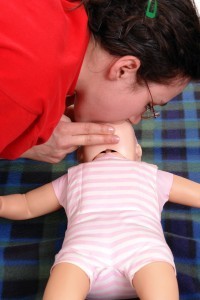
- Use a barrier device if available.
- Make a seal using your mouth over the mouth and nose of the patient.
- Each rescue breath should be small and last approximately 1 second.
- Watch for chest rise.
- Allow time for the air to expel from the patient.
During normal CPR with an advanced airway:
- Provide 12-20 rescue breaths per minute (do not stop chest compressions for rescue breaths).
If the patient has a pulse and no CPR is required:
- Provide 12-20 rescue breaths per minute.
- Recheck pulse every 2 minutes.
Recovery position for infants
- Cradle the infant with the infant’s head tilted downward and slightly to the side to avoid choking or aspiration.
- Continually check the infants breathing, pulse, and temperature.
Defibrillate
Arrival of AED (Automated External Defibrillator)
Power:
- Turn AED On NOW! (early defibrillation is the single most important therapy for survival of cardiac arrest. Begin use on patient as soon as it arrives).
- Follow verbal AED prompts.
Attachment:
- Firmly place appropriate pads (adult/pediatric) to patient’s skin to the indicated locations (pad image).
Analyze:
A short pause in CPR is required to allow the AED to analyze the rhythm.
If the rhythm is not shockable:
- Initiate 5 cycles of CPR.
- Recheck the rhythm at the end of the 5 cycles of CPR.
If shock is indicated:
- Assure no one is touching the patient or in mutual contact of a good conductor of electricity by yelling “Clear, I’m Clear, you’re Clear!” prior to delivering a shock.
- Press the shock button when the providers are clear of the patient.
- Resume 5 cycles of CPR.
Manual defibrillators are preferred for infant use. If the manuals defibrillator is not available the next best option is an AED with a pediatric attenuator. An AED without a pediatric attenuator can also be used.
CPR: for a child older than 1 year of age to puberty
CABD (Circulation, Airway, Breathing, Defibrillate)
You find a child lying on the ground.
Assess to make sure the scene is safe for you to respond to the down patient.
Assess Unresponsiveness:
- Stimulate and speak to the child.
- Look at the chest and torso for movement and normal breathing.
If unresponsive:
(One provider) If alone and collapse is un-witnessed:
- Perform 2 minutes of CPR first then call the emergency response team and bring an AED to the patient.
If alone and collapse is witnessed:
- (one provider) Call the emergency response team and bring an AED first, then start CPR.
- (two providers) Have someone near call the emergency response team and bring the AED.
- (two providers) You start CPR.
Place patient supine on a hard flat surface.
Circulation
- Check the patient for a carotid pulse for 5-10 seconds.
If pulse:
Move to the airway and rescue breathing portion of the algorithm:
- Provide 12-20 rescue breaths per minute.
- Recheck pulse every 2 minutes.
If no pulse:
Begin 5 cycles of CPR (lasts approximately 2 minutes)
Start with chest compressions:
- Provide 100 to 120 compressions per minute. This is 30 compressions every 15 to 18 seconds.
- Use one or two arms.
- Place one or both of your palms midline, one over the other, on the lower sternum, between the nipples.
- Press at least to 1/3 the depth of patient’s chest or 2 inches.
- Press hard and fast.
- Allow for full chest recoil with each compression.
- Allow for only minimal interruptions to chest compressions.
(One Provider: 1 cycle is 30 chest compressions to 2 rescue breaths) (Two Providers: 1 cycle is 15 chest compressions to 2 rescue breaths)
If you have two providers: switch rolls between compressor and rescue breather every 2 minutes or 5 cycles of CPR.
Airway
In the event of an unwitnessed collapse, drowning, or trauma: Use the Jaw-Thrust maneuver. (this maneuver is used when cervical spine injury cannot be ruled out):
- Place your fingers on the lower rami of the jaw.
- Provide anterior pressure to advance the jaw forward.
In the event of a witnessed collapse and there’s no reason to assume a C-spine injury: Use the Head Tilt-Chin Lift maneuver.
- place your palm on the patient’s forehead and apply pressure to tilt the head backward.
- place the fingers of your other hand under the mental protuberance of the chin and pull the chin forward and cephalic.
Breathing
Scan the patients chest and torso for possible movement during the “assess unresponsiveness” portion of the algorithm. Watch for abnormal breathing or gasping that will require additional ventilatory support.
If adequate breathing:
Continue to assess and maintain a patent airway and place the child in the recovery position. (Only use the recovery position if its unlikely to worsen patient injury)
If not or inadequate breathing:
has a pulse: Commence rescue breaths immediately.
no pulse: Begin CPR (go to Circulation portion of the algorithm).
- Use a barrier device if available.
- Pinch the patient’s nose closed.
- Make a seal using your mouth over the mouth of the patient.
- Each rescue breath should last approximately 1 second.
- Watch for chest rise.
- Allow time for the air to expel from patient.
During normal CPR without an advanced airway:
(One provider) Provide at least 6 rescue breaths per minute.
(Two provider) Provide at least 12 rescue breaths per minute.
During normal CPR with an advanced airway:
- Provide 12-20 rescue breaths per minute (do not stop chest compressions for rescue breaths).
If patient has a pulse and no CPR is required:
- Provide 12 -20 rescue breaths per minute.
- Recheck pulse every 2 minutes.
If foreign body obstruction:
- Perform abdominal thrusts.
Recovery position (lateral recumbent or 3/4 prone position)
This position is used to maintain a patent airway in the unconscious person.
- place the patient close to a true lateral position with the head dependent to allow fluid to drain.
- Assure the position is stable.
- Avoid pressure of the chest that could impairs breathing.
- Position patient in such a way that it allows turning them onto their back easily.
- Take precautions to stabilize the neck in case of cervical spine injury.
- Continue to assess and maintain access of airway.
- Avoid the recovery position if it will sustain injury to the patient.
Defibrillate
Arrival of AED (Automated External Defibrillator)
Power:
- Turn AED On NOW! (early defibrillation is the single most important therapy for survival of cardiac arrest. Use immediately upon its arrival to the scene).
- Follow verbal AED prompts.
Attachment:
- Firmly place appropriate pads (adult/pediatric) to patient’s skin to the indicated locations (pad image).
Analyze:
A short pause in CPR is required to allow the AED to analyze the rhythm.
If rhythm is not shockable:
- Initiate 5 cycles of CPR.
- Recheck the rhythm at the end of the 5 cycles of CPR.
If shock is indicated:
- Assure no one is touching the patient or in mutual contact of a good conductor of electricity by yelling “Clear, I’m Clear, you’re Clear!” prior to delivering a shock.
- Press the shock button when the providers are clear of the patient.
- Resume 5 cycles of CPR.
An AED with a pediatric attenuator should be used in children under 8 years of age if available. An AED without a pediatric attenuator can also be used.
Choking: Adult to Child Over 1 Year Old

Signs and symptoms of a child/adult choking:
Universal signal for choking:
patient has both hands wrapped around the base of their throat.
With complete airway obstruction, the child is unable to speak, cry, or provide any sounds of respiration.
The patient may be confused, weak, obtunded, or cyanotic.
Partial airway obstruction may result in stridor or a high-pitched audible noise during respiration. Partial airway obstruction may allow for a productive cough or allow the patient to speak.
Get the patient’s attention and ask them if they are choking.
Assess for signs and symptoms of airway obstruction.
If partial airway obstruction:
- Do not attempt Heimlich maneuver.
If complete airway obstruction:
- (one provider) immediately call the emergency response team.
- (one provider) Attempt Heimlich maneuver
- (two provider) Send someone to call the emergency response team, while you attempt the Heimlich maneuver.
How to perform the Heimlich maneuver:
- Stand directly behind the child/adult.
- Place both of your arms around patient’s waist.
- Make a fist with one hand and grab the fist with opposite hand.
- Position the thumb end of the fisted hand immediately above the patient’s naval (ample distance away from the xiphoid process).
- Perform fast upward and inward diaphragmatic abdominal thrusts.
- Continue abdominal thrusts until the obstruction is removed.
If patient becomes unconscious:
- Initiate CPR.
Before attempting rescue breaths during normal CPR, assess the airway, removing any visually present obstruction.
Do not use a blind finger sweep in an attempt to remove an obstruction.
Choking: Infant Under 1 Year Old

Signs and symptoms of an infant choking:
With complete airway obstruction, the infant is unable to speak, cry, or provide any sounds of respiration. The infant may be confused, weak, obtunded, or cyanotic.
Partial airway obstruction may result in stridor or a high-pitched audible noise during respiration. If the child has a partial airway obstruction, powerful cough, or strong audible cry, do not attempt the Heimlich maneuver.
If signs and symptoms of choking are present and infant is conscious:
- (one provider) immediately call the emergency response team.
- (one provider) Assess the airway for any visually present obstruction and manually remove it if possible.
- (two provider) Send someone to call the emergency response team while you assess the airway.
- Never use a blind finger sweep.
Position the patient:
- Lay infant’s face and torso down on forearm (prone) with chest being supported by your palm and their head and neck by your fingers.
- Tilt the infant’s body at a 30 degree angle, head downward (trandelenburg).
- Use your thigh or other object for support.
Interventional Back Blows:
- Provide 5 rapid forceful blows using a flat palm on the infant’s back between the two scapula.
Reposition the patient:
- Rotate the infant face up (supine), head downward (trandelenburg) by switching the infant to the opposite arm.
Interventional Chest Thrusts:
- Place your two fingers on the center of the infant’s sternum immediately below the nipple line.
- Provide 5 rapid compressions, with thrusts equaling 1/3 to 1/2 the total depth of the chest.
- Continue cycling back and forth between interventional back blows and chest thrusts until the obstruction is removed or until consciousness is lost.
If becomes unconscious:
- Initiate CPR.
- Before attempting rescue breaths during normal CPR, assess the airway, removing any visually present obstruction.
- Do not use a blind finger sweep in an attempt to remove an obstruction.
Secondary ABCD (Airway, Breathing, Circulation, Differential Diagnosis)
Airway (two provider)
- Initially provide rescue breaths using an ambu bag and a mask at full flow oxygen.
- Perform continued assessment of airway patency while giving breaths.
- Have the person doing chest compressions pause during the 2 rescue breaths.

If the patient is not ventilating well or if there is a presumed risk of aspiration, insert an advanced airway device when prudent:
Endotreacheal Intubation is the preferred method.
(View the advanced airway section)
Breathing
Confirm correct placement of the advanced airway device:
- Look for condensation during exhalation.
- Look for equal bilateral chest rise.
- Confirming equal bilateral breath sounds with auscultation.
- Auscultate stomach to assure esophageal intubation didn’t occur.
- End-tidal CO2 should be verified during exhalation using monitor or ETD
- Use portable chest x-ray.
If incorrect placement:
- Remove the airway device, ventilate the patient using the ambu bag for a short period of time, and then reattempt placement.
If correct placement:
- Secure placement of the airway device.
Continue to monitor:
- oxygenation saturation with pulse oximeter
- end-tidal CO2
Rescue breathing during CPR with an advanced airway:
- 8-10 breaths per minute (1 breath every 6-8 seconds)
- Chest compressions should be given continuously at a rate of 100 to 120 per minute.
Circulation
- Obtain IV or IO access.
- Monitors (ECG, BP cuff, pulse oximeter, et CO2 monitor)
Identify:
- heart rhythm
- Obtain a 12 lead ECG if possible.
- Initiate therapy of ACLS algorithm corresponding with the identified heart rhythm. (Drug therapy, Electrical therapy, Pacing, etc.)
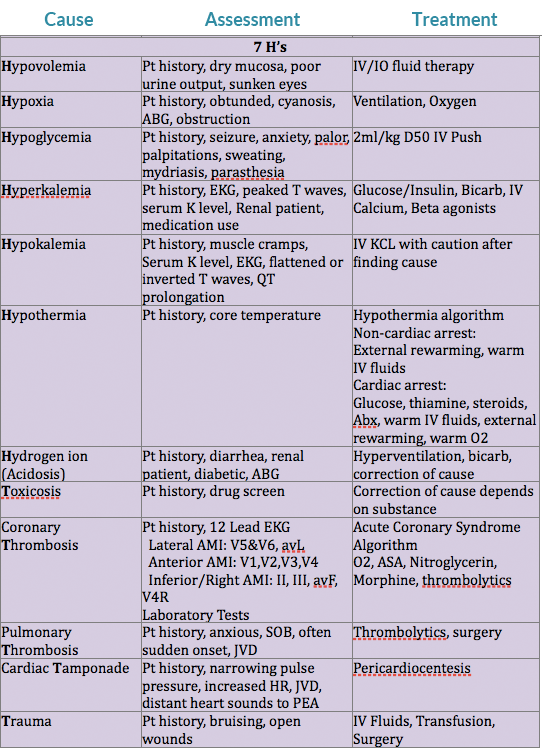
Differential Diagnosis
(needed for successful treatment of some patients)
Consider reversible causes of rhythm/arrhythmia.
Differential Diagnosis Chart:
Airway & Breathing
There are two important principles when evaluating the airway and breathing. First, is the airway patent or obstructed. Second, is there possible injury or trauma that would change the providers method of treating an obstructed airway or inefficient breathing.
Patent/obstructed
If the airway is patent there should be noticeable chest rise/expansion with either spontaneous respirations or with rescue breaths. The provider may also be able to hear or feel the movement of air from the patient.
A completely obstructed airway will be silent. An awake patient will lose their ability to speak, while both a conscious or unconscious patient will not have breath sounds on evaluation. If the patient is attempting spontaneous breaths without success, there may be noticeable effort of intercostal muscles, diaphram, or other accessory muscles without significant chest rise/expansion. The provider will also not feel or hear the movement of air. If the airway is partially obstructed snoring or stridor may be heard.
Cervical Spine Injury?
If the provider evaluates the patient to have an obstructed airway, intervention should take place. If the adverse event of the patient was witnessed and there is no reason to suspect a cercival spine injury, the provider should use the head tilt-chin lift maneuver to open the airway.
If there is a reason to suspect a cervical spine injury, if the patient’s adverse event went unwitnessed, if trauma occured, or the patient suffered drowning the jaw-thrust maneuver should be used to open the airway. If the jaw-thrust proves unsuccessful in opening the patient’s airway attempt an oropharangeal or nasopharangeal airway. If neither technique works, attempt an advanced airway using inline stabilization.
Brain Injury?
The breathing center that controls respirations is found within the pons and medulla of the brain stem. If trauma, hypoxia, stroke, or any other form of injury affects this area, changes in respiratory function may occur. Some possible changes are apnea (cessation of breathing), irregular breathing patterns, or poor inspiratory volumes. If the breathing pattern or inspiratory volumes are inadequate to sustain life, rescue breathing will be required, and an advanced airway should be placed.
Oral Airway:
- Assure the artificial airway is the appropriate size for the patient.
- The airway should be easily inserted with a tongue blade.
- Avoid use in patients with an active gag reflex.
Nasal Trumpet Airway:
- Best practice is to lube before insertion.
- Careful not to cause trauma to nasal mucosa (results in bleeding).
- This is reasonably tolerated by patients with an active gag reflex.
Advanced Airways
Indications:
- When you are unable to open airway using head tilt-chin lift or jaw thrust maneuvers.
- If you have difficulty forming a seal with the face mask.
- If the patient requiring continued ventilatory support.
- When the patient has a high risk for aspiration (provide an ETT or Combitube).
Remember, a patient should be unconscious or sedated without an active gag reflex before instrumentation of the airway occurs with an ETT, Combitube, or LMA.
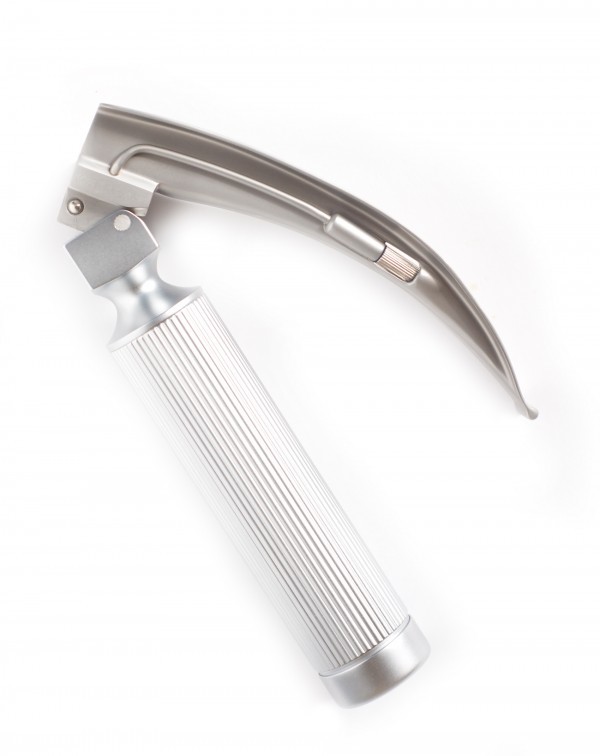
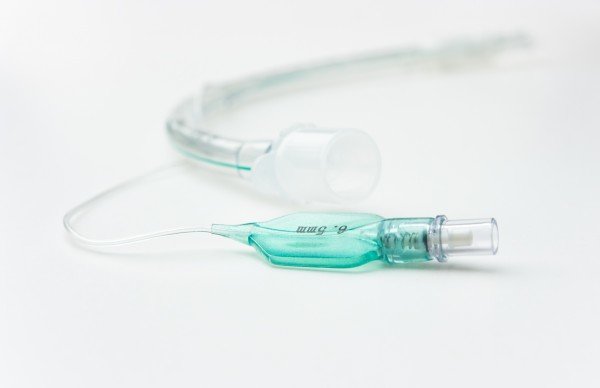
Endotracheal Tube (ETT)
- Requires additional instrument for insertion (laryngoscope, glidescope, fiberoptic).
- Laryngoscope blades (average adult size): MAC 3 or 4, Miller 2 or 3. ETTs require mastery of technique for consistent appropriate placement.
- Average size of ETT for orotracheal intubation for adults is 7.5mm.
- The ETT is placed into the trachea, having direct visualization of the vocal cords.
Average depth of intubation:
- adult male is 23cm
- adult female is 21cm
- Tracheal cuff of the ETT is then inflated.
- Allows for positive pressure ventilation.
- Reduces risk of aspiration.
- Helps maintain placement of ETT.
- Confirm placement of ETT.
- Secure in place of ETT.
Esophageal-Tracheal Combitube
- Gently advance the combitube into the mouth midline along the base of the tongue.
- Assure tube rotation of the combitube is following the curvature of the pharynx.
- Cease advancement of the tube once the heavy black rings reach the patient’s teeth.
- The Combitube is blindly placed into the esophagus 80% of the time and into the trachea 20% of the time.
- The combitube provides ventilatory access irregardless of tracheal or esophageal intubation.
- Inflate the pharangeal cuff with 100ml of air. Prevents leak through the nose and mouth. Helps secure placement.
- Inflate the tracheal cuff with 15ml of air. Prevents ventilation of stomach. Reduces risk of aspiration of stomach content.
- Secure in place of ETT.
First attempt confirmation of esophageal intubation by ventilating through the esophageal tube. (See “Secondary ABCD” section regarding placement confirmation)
If placement not confirmed through esophageal tube:
- Attempt confirmation of tracheal intubation by ventilating through the tracheal tube. (See “Secondary ABCD” section regarding placement confirmation)
Once placement has been confirmed:
- Mark which tube should be used for ventilation.
- Secure tube in place.
- Both cuffs must be inflated to appropriately ventilate a patient in the case of esophageal intubation.
Laryngeal Mask Airway (LMA)
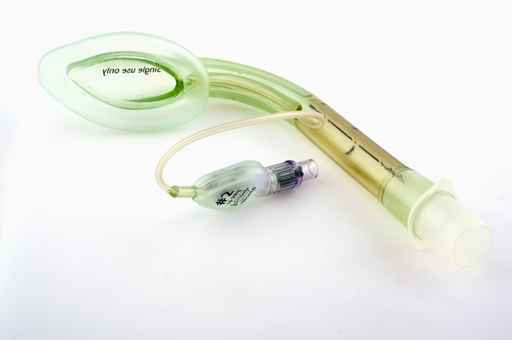
Visualization of the vocal cords is not required for insertion.
- When inserting the LMA have the laryngeal cuff deflated.
- Guide in the LMA cuff without folding back the tip, pressing it against the hard palate.
- Advance the LMA till the cuff lies in the pharynx.
- After placement, inflate the laryngeal cuff and check for an adequate seal by using positive pressure ventilation.
Positive pressure ventilation is generally kept under 20 CmH2O to prevent inflation of the stomach. LMA’s are contraindicated for the morbidly obese patient.
The patient is still at high risk of aspiration, even with an appropriately placed LMA. LMA’s are contraindicated in patients with GERD, full stomachs, and pregnant women.
Cardiac/Electrical Therapy
Transcutaneous Pacemaker (External Pacemaker):
Used to treat unstable bradycardias not responding to drug therapy. Provides temporary pacing through the skin in emergency situations.
- Place pads and electrodes in correct position to assure an appropriate ECG reading.
- Set the pacer 10-20 beats per min above the patient’s intrinsic heart rate or 60 beats per min if there is no intrinsic heart rate.
- Start at O mA and work energy level up until you have capture (heart pulsation).
- Assure the patient is sedated and comfortable during pacer delivery.
Cardioversion:
- Used if drug therapy and vagal maneuvers fail.
- Used when patient has a pulse.
- Used to treat Atrial Fibrillation, Atrial Flutter, Atrial Tach, and Symptomatic VT.
- Shock performed at peak of R wave.
- Requires proper lead/pad placement to monitor ECG.
Shock energy level:
Monophasic: 100-200J
Biphasic: factory recommendations (generally 100J)
Assure the patient is sedated and comfortable during shock delivery.
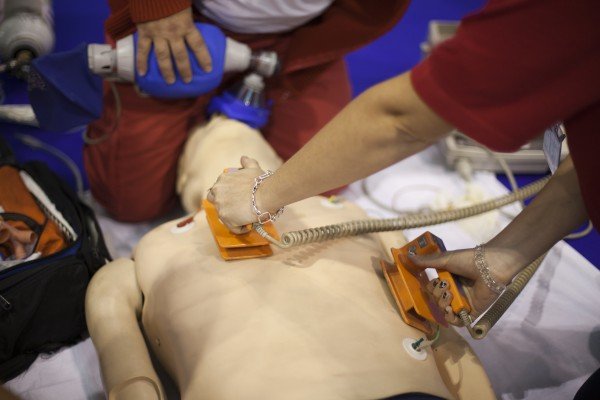
Defibrilation:
- Used to treat VF and pulseless VT.
- Delivery within first 5 mins of cardiac arrest has best results.
- CPR before and after each shock improves outcomes.
Shock energy level:
Monophasic: 360J
Biphasic: factory recommendations (generally 120-200J)
Common Cardiac Rhythms
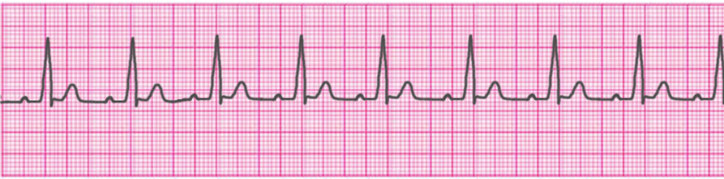
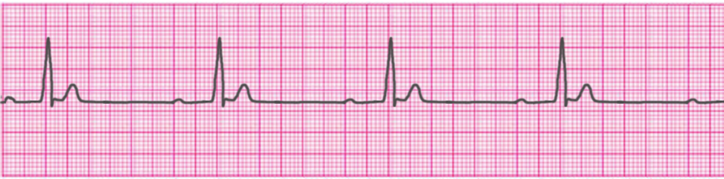
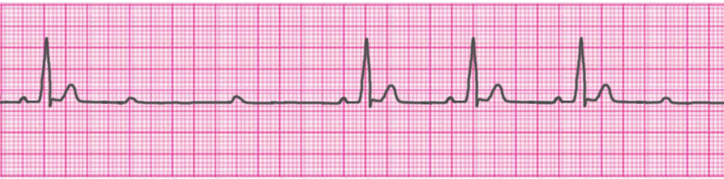
Normal Sinus Rhythm
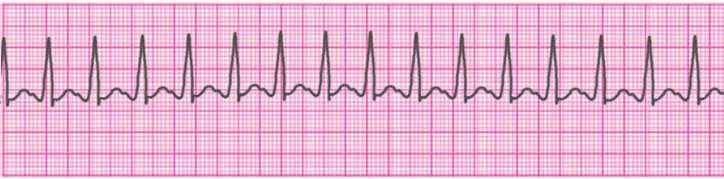
Atrial Tachycardia
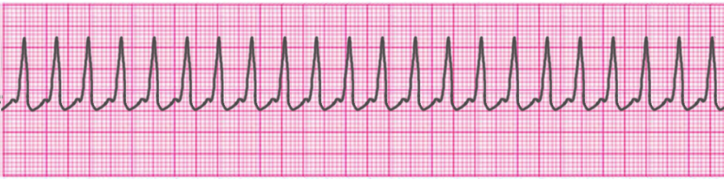
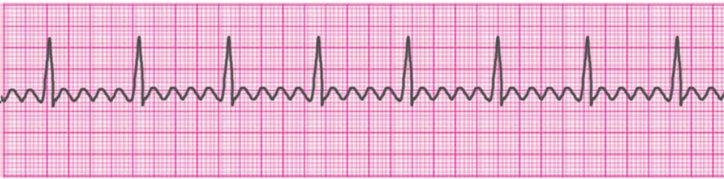
Supraventricular Tachycardia
Atrial Fibrillation
Atrial Flutter
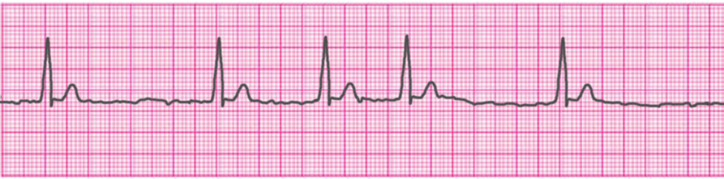
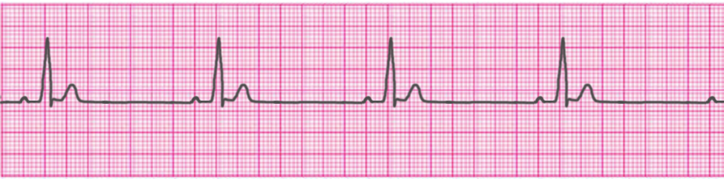
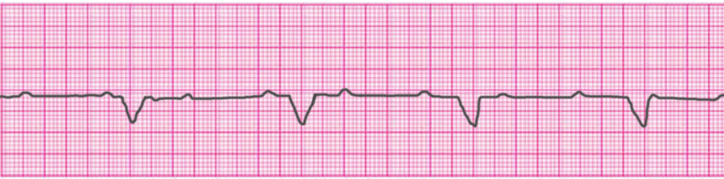
Sinus Bradycardia
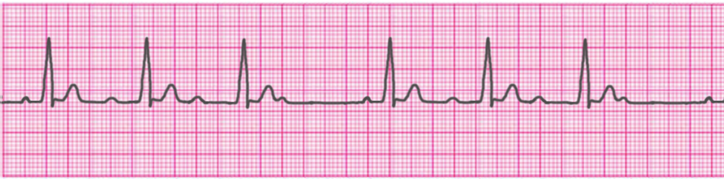
1° Atrioventricular Block
2° Atrioventricular Block- Type 1 (Mobitz I/Wenckebach)
2° Atrioventricular Block- Type 2 (Mobitz II/Hay)
3° Atrioventricular Block (Complete Heart Block)
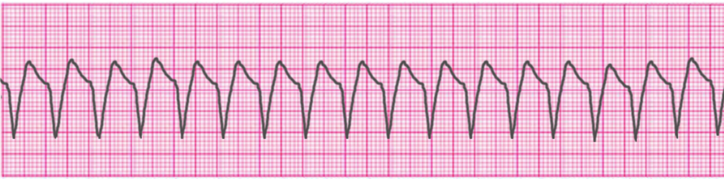
Ventricular Tachycardia – Monomorphic
Ventricular Tachycardia – Polymorphic
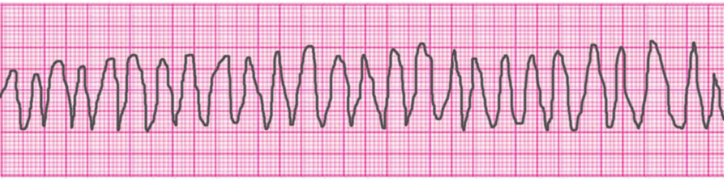
Ventricular Tachycardia – Torsades de Pointes
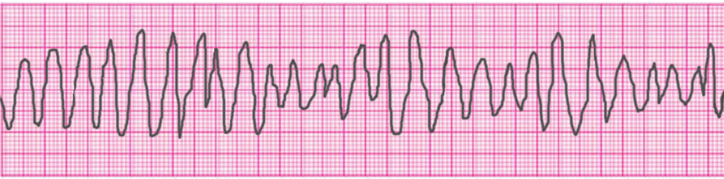
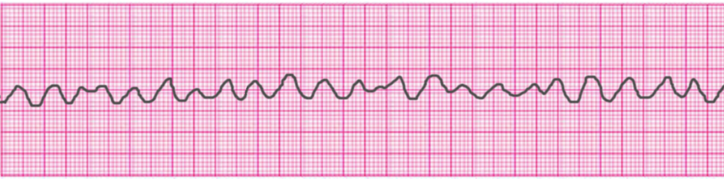
Ventricular Fibrillation
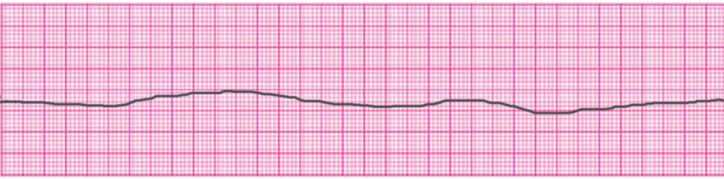
Asystole
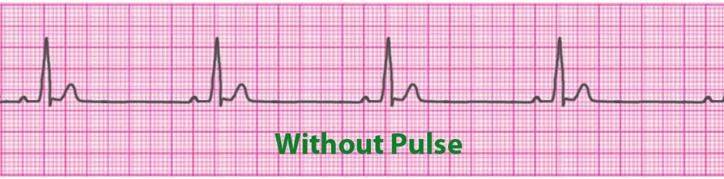
Pulseless Electrical Activity (PEA)
Access Our Complete Training Materials.
Lets Get You Certified!
Register for ACLS Certification
$119
Register for ACLS Recertificaiton
$119
Acute Myocardial Infarction
ACLS Adult Cardiac Arrest Algorithm

- Determine if the patient is Stable or Unstable.
- Initiate CABD and Secondary ABCD.
- Use appropriate ACLS algorithm.
- Generally accepted treatments: “MONA”: Morphine, Oxygen, Nitrates, and Aspirin
- Consider fibrinolytic therapy.
Tachycardias
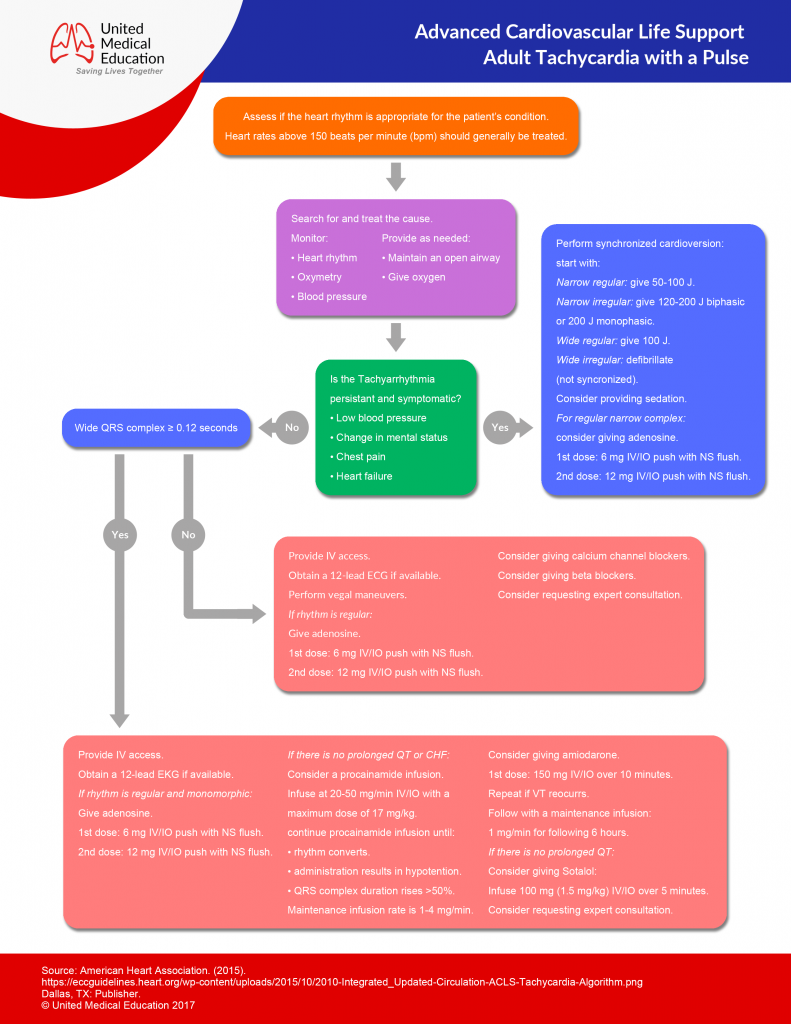
- Determine if the patient is Stable or Unstable.
- Initiate CABD and Secondary ABCD.
Narrow QRS Complex – Stable
Regular:
- Attempt vagal maneuvers.
- first line Rx is: Adenosine 1st dose: 6mg IV then 2nd and 3rd doses: 12mg IV
- Other Rx options include: Diltiazem and Beta blockers
Irregular:
- Rx options include: Diltiazem and Beta blockers
Narrow QRS Complex – Unstable
- Sedate the patient and provide cardioversion.
- Tx Atrial Fibrillation: first shock 100-200j
- Tx Atrial flutter and SVT: first shock 50-100j
Wide Complex – Stable
Regular:
Ventricular Tachycardia (monomorphic):
- Sedate the patient and provide cardioversion.
- Amiodarone 150mg IV over 10 min every 3-5 min, with a max of 2.2g in a 24hrs period.
- Procainamide 20 to 50 mg/min IV until arrhythmia resolves, hypotension occurs, there is >50% increase in QRS duration, or the max dose of 17 mg/kg is reached (Maintenance infusion: 1 to 4 mg/min)
- Sotalol 1.5 mg/kg over 5 min
- Procainamide and sotalol should be avoided in patients with prolonged QT.
SupraVentricular Tachycardia (SVT) with Aberrancy:
- Adenosine 1st dose: 6mg IV then 2nd and 3rd doses: 12mg IV.
Irregular:
Atrial Fibrillation with Aberrancy:
- Rx options include: Cardizem, Beta Blockers
Atrial Fibrillation with Wolff Parkinson White (delta wave):
- Avoid!!!: adenosine, verapamil, cardizem, and digoxin.
- Give Amiodarone 150mg IV over 10 min
Toursades de Pointes:
- Give magnesium 1 to 2g IV over 2 min
Wide Complex – Unstable
Ventricular Tachycardia (VT) – monomorphic:
- If still partially conscious, sedate the patient.
- Attempt to cardiovert: 1st attempt with 100j, 2nd attempt with 200j, 3rd attempt with 300j, then following attempts with 360j
Ventricular Tachycardia (VT) – polymorphic:
- Defibrilate the patient at 360j with a monophasic or 120-200j with a biphasic
Pulseless Ventricular Tachycardia / Ventricular Fibrillation (Refractory):
CABD, ABCD
Using defibrillator:
- Verify presence of VF: Defibrillate the patient at 360j using monophasic or at the factory recommended joules for a biphasic.
Drug treatment options:
- Epinephrine 1mg IV every 3-5min.
- Amiodarone 300mg IVP, repeated once in 3-5 min with following boluses at 150mg.
- Magnesium Sulfate: give 1-2gm in 1-2 min
Treat the cause of the arrhythmia.
Bradycardia (Rate < 60)
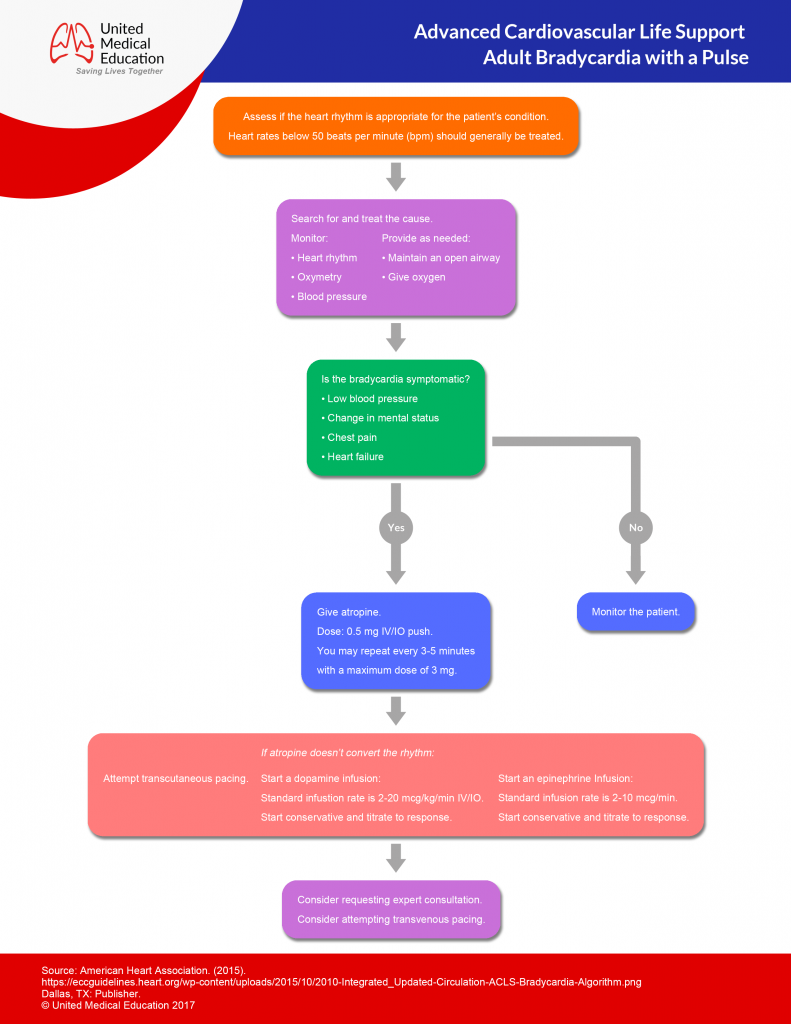
- CABD, ABCD
- Determine if the patient is stable or unstable.
Stable:
- Monitor for changes in the hemodynamic status of the patient.
Unstable:
- Give epinephrine 1mg IV every 3-5min until transcutaneous pacing can be initiated.
- Initiate transcutaneous pacing until transvenous pacing can be initiated.
- If TCP fails or intravenous pacing is delayed consider Epinephrine (2-10 mcg/min IV), Dopamine (5-20 mcg/kg/min), or Isoproterenol (3-20 mcg/mim).
- Treat causes (atropine 0.5-1mg IV may be used if vagal mechanism is suspected).
Asystole
- CABD, ABCD
- (if lead II is asystolic, confirm rhythm in leads avL and III.)
Drug therapy:
- Give epinephrine 1mg IV every 3-5min.
- Give atropine 1mg IV every 3-5 min, with a max dose of 3mg.
Pulseless Electrical Activity
- CABD, ABCD
Drug Therapy:
- Give epinephrine 1mg IV every 3-5min.
- Give Atropine if bradycardic arrhythmia is present: 1mg IV every 3-5 min with a max of 3mg.
- Treat the cause of the arrhythmia.
Acute Stroke
Initiated treatment within 10 min of arrival to the ER:
- CABD, ABCD
- Assess patient’s rhythm and treat with appropriate ACLS algorithm.
- Attempt to eliminate other causes of symptoms (use patient history).
- Obtain neurological assessment and tests by a specialist.
Initiated treatment within 25 min of arrival to the ER:
- Establish if onset of symptoms has been less than 3 hours.
- Continue neurological exams (non-Contrast CT scan), and monitor hemodynamics.
- Determine if fibrinolytic therapy is appropriate.
ACLS Case Scenarios
1) You are shopping at a grocery store and an elderly lady in the produce section suddenly grimaces, grabs her chest, and falls to the floor. You and a few others hurry to her side and she quickly becomes unresponsive.
Appropriate Action:
- Initiate CABD.
- Have one onlooker call for help.
- Have another onlooker retrieve the AED.
- Look, listen, and feel for breathing.
[Patient is not breathing.]
- Assess for pulse.
[Patient has no pulse.]
- Begin 2 person CPR.
[Have the student explain the steps of 2 person CPR.]
[Onlooker arrives with the AED.]
- Initiate appropriate use of the AED.
[Have the student explain the correct use of the AED.]
[After the AED analyzes the patient a shock is recommended.]
- Assure onlookers and yourself are clear of the patient.
- Initiate shock.
- Follow instructions of the AED until the arrival of medical transport.
2) You are just returning from lunch to the ER and you hear a code blue being initiated in bay 2. You run to the bay to find a patient confused, obtunded, and lethargic in the bed. Oxygen by NC, ECG, and IV access are already established. The nurse is unable to cycle a blood pressure. When assessing the ECG you see:
What should you do next?
- Initiate CABD and ABCD.
[Patient is breathing.]
[Faint pulse is felt approximately 35 times a minute.]
- Initiate transcutaneous pacing.
[Central line access is established.]
- Initiate transvenous pacing.
3) You enter your friends house to find their elderly grandmother staring at the wall and leaning to their side.
[Have student identify signs of stroke.]
[Have student perform prehospital stroke assessment.]
- Assess for unusual speech.
- Assess for facial drooping.
- Assess for arm drift.
- Attempt to establish a history of onset and events.
- Transport patient to hospital.
- Check patient’s blood glucose.
[Have student explain appropriate medical interventions for this patient.]
If the patient doesn’t have a pulse:Begin 5 cycles of CPR (lasts approximately 2 minutes).Start with chest compressions:
Congratulations!
You’re Ready to Certify.
Register for ACLS Certification
$119
Register for ACLS Recertificaiton
$119